You can personalize your email blasts, automated emails and newsletters by including the first and/or last name of your subscribers.
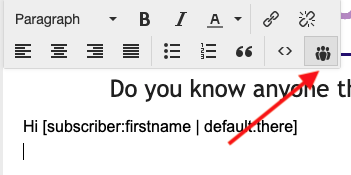
To do this, click into the text editor of your email and then look for the icon in the screenshot below (looks like 3 people).
This then gives you a few shortcode options to select from:

Click the one you want (eg First Name) and it should bring in the following:
Hi [subscriber:firstname | default:reader].
In the example above, it will show Hi reader if you don't have their first name on record. You could change this to Hi there or similar to suit your style.
Full list of available shortcodes
User:
- First Name: [user:firstname | default:subscriber]
- Last Name: [user:lastname | default:subscriber]
- Email Address: [user:email]
Newsletter:
- Newsletter Subject: [newsletter:subject]
- Show number of posts: [newsletter:total]
- Show latest post's title: [newsletter:post_title]
- Display the issue number: [newsletter:number]
Date:
- Current day of the month number: [date:d]
- Current day of the month in ordinal, ie. 2nd, 3rd, etc : [date:dordinal]
- Full name of current day: [date:dtext]
- Current month number: [date:m]
- Full name of current month: [date:mtext]
- Year: [date:y]
Links:
- Unsubscribe link: [global:unsubscribe]
- Edit subscription page link: [global:manage]